Chapter 19: Drawing 3-D objects
Previous chapter LLUs Home Next chapter
The Threed utility allows you to define a perspective transformation (a projection) from a three-dimensional space to a two-dimensional space and then to draw the perspective images of objects (points, lines, curves, perimeters, and character strings) defined in three dimensions.
Note: Threed has been essentially unchanged since the early 1970s. There are plans to replace it with a new package that has a more consistent and modern interface. This new package will unify the functionality of all three of the utilities Threed, Surface, and Isosurface.
 The Threed utility has ten user entry points. This module lists the routines in functional groups.
- SET3
- Defines the transformation from three dimensions to two dimensions.
- CURVE3
- Draws the projection of a curve defined by a sequence of points in 3-space.
- LINE3
- Draws the projection of a straight-line segment.
- FENCE3
- Draws the projection of a curve, just as CURVE3 does, but with a "fence" of straight line segments that are parallel to one of the three axes and that extend to a specified plane perpendicular to that axis.
- FRST3
- Specifies the first in a sequence of points connected by straight-line segments, the projections of which are to be drawn. (FRST3 is called for the first point in the sequence and VECT3 is called for the rest.)
- PERIM3
- Draws the projection of a rectangular perimeter in a plane parallel to one of the three coordinate planes, with inward-pointing tick marks at specified intervals.
- POINT3
- Draws the projection of a point.
- PWRZT
- Draws the projection of character strings that are positioned in a plane parallel to one of the three coordinate planes.
- VECT3
- Defines the second and all subsequent points in a sequence of points connected by straight-line segments, the projections of which are to be drawn. (FRST3 is called for the first point in the sequence and VECT3 is called for the rest.)
- TICK43
- Gives user control of tick mark length in PERIM3.
The routine SET3 is called to define the 3-D to 2-D transformation to be used.

1 CALL SET3 (.1,.9,.1,.9,UMIN,UMAX,VMIN,VMAX,WMIN,WMAX,PEYE)
 CALL SET3 (XMIN, XMAX, YMIN, YMAX,
+ UMIN, UMAX, VMIN, VMAX, WMIN,
+ WMAX, PEYE)
- XMIN, XMAX, YMIN, YMAX
- Real, Input---Fractional coordinates (in NDCs) defining the portion of the plotter frame (the "viewport") into which 3-D objects are to be projected. Each has a value between 0. and 1., inclusive. Examples: To use the whole plotter frame, set XMIN=0., XMAX=1., YMIN=0., and YMAX=1.; to use the upper left quarter of the plotter frame, set XMIN=0., XMAX=.5, YMIN=.5, and YMAX=1.
- UMIN, UMAX, VMIN, VMAX, WMIN, WMAX
- Real, Input---The limiting coordinates, in a 3-D coordinate space of the user's choosing, of the rectangular box that is to be projected. This box normally contains all of the objects whose projections are to be drawn.
- PEYE
- Real array, Input---An array of length three, specifying the coordinates, in the user's 3-D coordinate system, of the eye position. The point (PEYE(1),PEYE(2),PEYE(3)) must be outside the box defined by UMIN, UMAX, VMIN, VMAX, WMIN, and WMAX. Objects will be drawn as they appear from this point.
The call to SET3 says what portion of the 3-D coordinate system is to be projected, from what point it is to be projected, and where the resulting picture is to be placed on the plotter frame.
The array PEYE specifies the position of the eye, which may be referred to as the "viewpoint" or "center" of the projection.
The "line of sight" runs from the point
- (PEYE(1),PEYE(2),PEYE(3))
(the eye position) to the point
- (UCEN, VCEN, WCEN)
(the point at the center of the projected box---UCEN=.5*(UMIN+UMAX), VCEN=.5*(VMIN+VMAX), and WCEN=.5*(VMIN+VMAX))
The "image plane" is perpendicular to the line of sight and may be thought of as passing through the point at the center of the projected box. The projection of an arbitrary point P in 3-space is the point where the straight line from the eye position to P passes through the image plane. The projection of a more complicated object is just the union of the projections of its constituent points.
The projection in the image plane of the box specified by the arguments UMIN, UMAX, VMIN, VMAX, WMIN, and WMAX will be scaled to fit in the viewport specified by the arguments XMIN, XMAX, YMIN, and YMAX. The projected box will retain its natural aspect ratio; typically, it will just touch the left and right edges of the viewport, or the top and bottom of the viewport, but not both.
The image of the box will be rotated so that the projection of a unit vector based at the center of the box and pointing in the direction of the positive W axis will be made to point upward in the viewport. However, if the line of sight is very nearly parallel to the W axis, so that the projection of this unit vector shrinks almost to a point, then a unit vector based at the center of the box and pointing in the direction of the positive V axis will be made to point upward in the viewport instead. One implication of this is that, if you are making a movie by letting the eye "fly around" the objects being projected and it gets too close to being directly above or below the center of the box, there may be a sudden disconcerting rotation of the projected image.
The routine PERIM3 is used to draw a perimeter in a plane perpendicular to one of the three axes in the 3-D coordinate system.
1       CALL PERIM3 (10,2,10,2,1,0.)
2       CALL PERIM3 (10,2,10,2,2,0.)
3       CALL PERIM3 (10,4,10,4,3,0.)
 CALL PERIM3 (MAJOR1, MINOR1,
+ MAJOR2, MINOR2, IAXIS, VALUE)
- MAJOR1
- Integer, Input---Specifies the number of major divisions of those sides of the perimeter parallel to direction 1. (Directions 1 and 2 are defined by the value of IAXIS.) Major divisions are indicated by tick marks.
- MINOR1
- Integer, Input---Specifies the number of minor divisions per major division along those sides of the perimeter parallel to direction 1. (Directions 1 and 2 are defined by the value of IAXIS.) Minor divisions are indicated by tick marks that, by default, are smaller than the tick marks indicating major divisions.
- MAJOR2
- Integer, Input---Specifies the number of major divisions of those sides of the perimeter parallel to direction 2. (Directions 1 and 2 are defined by the value of IAXIS.)
- MINOR2
- Integer, Input---Specifies the number of minor divisions per major division along those sides of the perimeter parallel to direction 2. (Directions 1 and 2 are defined by the value of IAXIS.)
- IAXIS
- Integer, Input---Specifies which of the three axes the perimeter is to be perpendicular to and identifies directions 1 and 2:
- 1 The perimeter is to be perpendicular to the U axis. Direction 1 is parallel to the V axis and direction 2 is parallel to the W axis.
- 2 The perimeter is to be perpendicular to the V axis. Direction 1 is parallel to the U axis and direction 2 is parallel to the W axis.
- 3 The perimeter is to be perpendicular to the W axis. Direction 1 is parallel to the U axis and direction 2 is parallel to the V axis.
- VALUE
- Real, Input---The value at which the plane of the perimeter is to intersect the axis specified by IAXIS. If IAXIS is a 1, VALUE is a U coordinate; if IAXIS is a 2, VALUE is a V coordinate; and, if IAXIS is a 3, VALUE is a W coordinate.
Each call to PERIM3 draws a perimeter: a rectangle representing the intersection of a plane perpendicular to one of the three axes with the box specified by the arguments UMIN, UMAX, VMIN, VMAX, WMIN, and WMAX in the last call to SET3. The perimeter can be placed at any desired position along the axis to which it is perpendicular; it can have inward-pointing major and minor tick marks along its edges, spaced as specified by the user. Tick marks along two parallel edges of the perimeter are controlled by one pair of arguments, and tick marks along the other two parallel edges are controlled by the other pair of arguments.
Each of the arguments MAJOR1 and MAJOR2 refers to the number of major divisions (spaces between ticks) rather than to the number of major ticks; counting those at the ends, there will be one more major tick than there are major divisions.
Each of the arguments MINOR1 and MINOR2 refers to the number of minor divisions (spaces between ticks) rather than to the number of minor ticks; in a given major interval, there will be one fewer minor tick than there are minor divisions.
The fthex01 example shows three different perimeters, one for each coordinate plane; the perimeters are placed on the far sides of the box. The rectangle itself is drawn in the current polyline color, as determined by the last call to the GKS routine GSPLCI; by default, color index 1 is used. Major ticks and minor ticks are drawn in the colors implied by the values of the variables ITHRMJ and ITHRMN in the Threed COMMON block
COMMON /THRINT/ ITHRMJ,ITHRMN,ITHRTX
The default value of both ITHRMJ and ITHRMN is 1; user code may change these values. All lines are drawn using the current GKS line width scale factor, as set by the last call to the GKS routine GSLWSC.
The routine TICK43 is used to set internal parameters specifying the lengths of the ticks on perimeters drawn by subsequent calls to PERIM3.

1 CALL TICK43 (12,8,24,16,48,32)
 CALL TICK43 (MAJORU, MINORU,
+ MAJORV, MINORV, MAJORW, MINORW)
- MAJORU
- Integer, Input---Specifies the length of major ticks to be used on perimeter sides that are parallel to the U axis.
- MINORU
- Integer, Input---Specifies the length of minor ticks to be used on perimeter sides that are parallel to the U axis.
- MAJORV, MINORV
- Integer, Input---Specify the lengths of major and minor ticks for perimeter sides parallel to the V axis.
- MAJORW, MINORW
- Integer, Input---Specify the lengths of major and minor ticks for perimeter sides parallel to the W axis.
All tick lengths are specified as integers between
0 and 1024. The value n produces a tick that is
n/1024ths as long as the longest side of the box defined by the arguments UMIN, UMAX, VMIN, VMAX, WMIN, and WMAX in the last call to SET3. The default values are 12 for a major tick and 8 for a minor tick.
The fthex01 example uses default-size tick marks on perimeter sides parallel to the U axis, double-size tick marks on perimeter sides parallel to the V axis, and quadruple-size tick marks on perimeter sides parallel to the W axis.
The routine POINT3 is called to draw the projections of points in 3-space.

1       DO 108 I=1,11
2          PTMP=REAL(I-1)/10.
3          DO 107 J=1,101
4             QTMP=REAL(J-1)/100.
5             CALL POINT3 (PTMP,QTMP,0.)
6             CALL POINT3 (QTMP,PTMP,0.)
7             CALL POINT3 (PTMP,0.,QTMP)
8             CALL POINT3 (QTMP,0.,PTMP)
9             CALL POINT3 (0.,PTMP,QTMP)
10            CALL POINT3 (0.,QTMP,PTMP)
11  107    CONTINUE
12  108 CONTINUE
CALL POINT3 (UPOS, VPOS, WPOS)
- UPOS, VPOS, WPOS
- Real, Input---The U, V, and W coordinates of a point whose projection is to be drawn.
The fthex01.f code segment above uses the routine POINT3 to draw grids in each of the three perimeters. While this produces a nice effect on most devices, it does add considerably to the size of the metafile produced and may be rather slow to display on some devices.
Each point is drawn by calling the GKS routine GPM to draw a polymarker of type 1. Points are therefore drawn in the current polymarker color, as determined by the last call to the GKS routine GSPMCI; by default, color index 1 is the one used.
Calling the GKS routine GSMKSC to change the polymarker size does not normally affect polymarkers of type 1, so there is no good way to make the points bigger; if you want to do this, you should use LINE3 (or perhaps FRST3 and VECT3) instead of POINT3 to draw an object of the desired size.
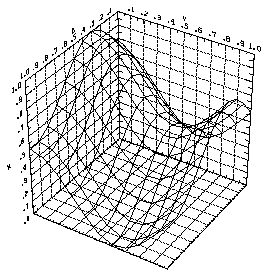
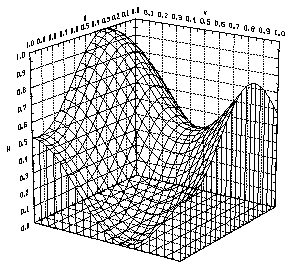
The routines FRST3 and VECT3 are used to draw the projections of straight-line segments in 3-space, using a "pen-move" paradigm. A curve may be approximated by drawing a sequence of connected straight-line segments.

1       WFUN(U,V)=.5+.25*SIN(5.*U)+.25*COS(5.*V)
2       CALL PLOTIF (0.,0.,2)
3       CALL GSLWSC (2.)
4       DO 110 I=1,11
5          UTMP=REAL(I-1)/10.
6          CALL FRST3 (UTMP,0.,WFUN(UTMP,0.))
7          DO 109 J=2,11
8                 VTMP=REAL(J-1)/10.
9                 CALL VECT3 (UTMP,VTMP,WFUN(UTMP,VTMP))
10 109     CONTINUE
11 110  CONTINUE
12      DO 112 J=1,11
13          VTMP=REAL(J-1)/10.
14          CALL FRST3 (0.,VTMP,WFUN(0.,VTMP))
15          DO 111 I=2,11
16                 UTMP=REAL(I-1)/10.
17                 CALL VECT3 (UTMP,VTMP,WFUN(UTMP,VTMP))
18 111      CONTINUE
19 112  CONTINUE
CALL FRST3 (UPOS, VPOS, WPOS)
CALL VECT3 (UPOS, VPOS, WPOS)
- UPOS, VPOS, WPOS
- Real, Input---The U, V, and W coordinates of a point in 3-space.
The fthex01.f code segment uses FRST3 and VECT3 to draw a simple wire-frame representation of the surface defined by the arithmetic statement function on line 1. Line 2 flushes the SPPS polyline buffer, so that lines waiting in that buffer to be drawn will not be affected by the change in line width that is requested by the GKS call on line 3. Lines 4 through 11 draw slices through the function parallel to the V/W plane. Lines 12 through 19 draw slices through the function parallel to the U/W plane.
Each call to FRST3 moves a conceptual "pen" to the new starting point for a sequence of line draws. Each call to VECT3 draws a line from the current pen position to a new pen position and then makes that the current pen position.
Line segments are drawn in the current polyline color, as determined by the last call to the GKS routine GSPLCI; by default, color index 1 is used. Line width is determined by the last call to the GKS routine GSLWSC; by default, the value of the line width scale factor is 1.
Note that the routines FRST3 and VECT3 do not flush the SPPS polyline buffer. In fact, to have them do so would entirely defeat the purpose of that buffer. Therefore, if your last call was to the routine VECT3 and you are about to call GKS routines to change color or line width, you must first call PLOTIF (as shown on line 2) to flush the buffer; otherwise, the color and line width changes will affect line draws flushed from the buffer later.
The routine LINE3 may be called to draw the projection of the straight line segment joining two points in 3-space.
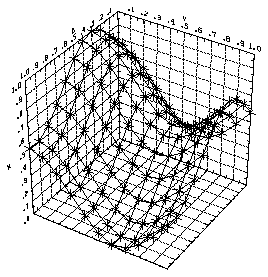
1       WFUN(U,V)=.5+.25*SIN(5.*U)+.25*COS(5.*V)
2       CALL PLOTIF (0.,0.,2)
3       CALL GSLWSC (2.)
4       DO 114 I=1,21,2
5          UTMP=REAL(I-1)/20.
6          DO 113 J=1,21,2
7                 VTMP=REAL(J-1)/20.
8                 WTMP=WFUN(UTMP,VTMP)
9                 CALL LINE3 (UTMP-.04,VTMP,WTMP,UTMP+.04,VTMP,WTMP)
10                CALL LINE3 (UTMP,VTMP-.04,WTMP,UTMP,VTMP+.04,WTMP)
11                CALL LINE3 (UTMP,VTMP,WTMP-.04,UTMP,VTMP,WTMP+.04)
12 113     CONTINUE
13 114 CONTINUE
 CALL LINE3 (UPOS1, VPOS1, WPOS1,
+ UPOS2, VPOS2, WPOS2)
- UPOS1, VPOS1, WPOS1
- Real, Input---The U, V, and W coordinates of a point in 3-space.
- UPOS2, VPOS2, WPOS2
- Real, Input---The U, V, and W coordinates of another point in 3-space.
The fthex02.f code segment uses LINE3 to draw a little set of "axes" at each point on a wire-frame representation of the surface defined by the arithmetic statement function on line 1. Line 2 flushes the SPPS polyline buffer, so that lines waiting in that buffer to be drawn will not be affected by the change in line width that is requested by the GKS call on line 3. (Note: LINE3 flushes the SPPS polyline buffer after drawing a line, so you needn't worry about its leaving anything in the buffer.) Lines 4 through 13 loop through the points on the grid, drawing the desired object at each of those points.
The statement:
 CALL LINE3 (UPOS1, VPOS1, WPOS1,
+ UPOS2, VPOS2, WPOS2)
is equivalent to the three statements:
CALL FRST3 (UPOS1, VPOS1, WPOS1)
CALL VECT3 (UPOS2, VPOS2, WPOS2)
CALL PLOTIF (0.,0.,2)
but is slightly more efficient. To approximate a curve defined by three or more points, though, it is not efficient to use LINE3, because the first point of each line segment after the first will be a repeat of the second point of the previous line segment and will therefore be repeated in the metafile. Thus, to approximate a curve, you should use FRST3 and VECT3 (or CURVE3, which is described in the next module).
Straight-line segments drawn by LINE3 are drawn in the current polyline color, as determined by the last call to the GKS routine GSPLCI; by default, color index 1 is used. Line width is determined by the last call to the GKS routine GSLWSC; by default, the line width scale factor is 1.
The routine CURVE3 may be called to draw the projection of a curve defined by an arbitrary number of points in 3-space.
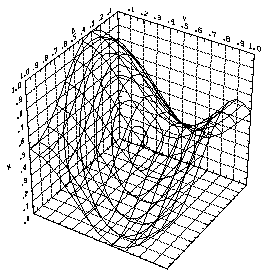
1       WFUN(U,V)=.5+.25*SIN(5.*U)+.25*COS(5.*V)
2       CALL PLOTIF (0.,0.,2)
3       CALL GSLWSC (2.)
4       DO 113 I=1,361
5          TEMP=5.*REAL(I-1)
6          UCRV(I)=.5+TEMP/3600.*COS(.017453292519943*TEMP)
7          VCRV(I)=.5+TEMP/3600.*SIN(.017453292519943*TEMP)
8          WCRV(I)=WFUN(UCRV(I),VCRV(I))
9  113  CONTINUE
10      CALL CURVE3 (UCRV,VCRV,WCRV,361)
 CALL CURVE3 (UCURVE, VCURVE,
+ WCURVE, NPNTS)
- UCURVE, VCURVE, WCURVE
- Real arrays, Input---Arrays of length at least NPNTS, containing the U, V, and W coordinates, respectively, of the points defining the curve whose projection is to be drawn.
- NPNTS
- Integer, Input---The number of points defining the curve.
The fthex03.f code segment generates and stores the U, V, and W coordinates of a sequence of points along a curve in 3-space (the curve is the intersection of a sort of spiral cylinder with the surface defined by the arithmetic statement function on line 1); it then calls CURVE3 to draw the curve. Note that no attempt is made to smooth the curve; it is approximated by drawing the straight-line segments defined by adjacent points in the input arrays.
Line 2 flushes the SPPS polyline buffer, so that lines waiting in that buffer to be drawn will not be affected by the change in line width that is requested by the GKS call on line 3. (Note: CURVE3 flushes the SPPS polyline buffer after drawing a curve, so you needn't worry about its leaving anything in the buffer.)
Lines 4 through 9 define the input arrays, and line 10 calls CURVE3.
Curves drawn by CURVE3 are drawn in the current polyline color, as determined by the last call to the GKS routine GSPLCI; by default, color index 1 is used. Line width is determined by the last call to the GKS routine GSLWSC; by default, the line width scale factor is 1.
The routine FENCE3 may be called to draw the projection of a curve defined by an arbitrary number of points in 3-space. It also draws a fence joining the curve to a plane perpendicular to one of the three coordinate axes.
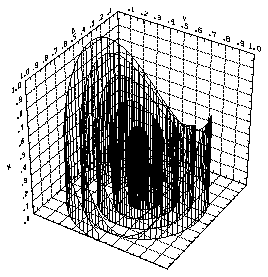
1       WFUN(U,V)=.5+.25*SIN(5.*U)+.25*COS(5.*V)
2       CALL PLOTIF (0.,0.,2)
3       CALL GSLWSC (2.)
4       DO 109 I=1,361
5          TEMP=5.*REAL(I-1)
6          UCRV(I)=.5+TEMP/3600.*COS(.017453292519943*TEMP)
7          VCRV(I)=.5+TEMP/3600.*SIN(.017453292519943*TEMP)
8          WCRV(I)=WFUN(UCRV(I),VCRV(I))
9  109  CONTINUE
10      CALL FENCE3 (UCRV,VCRV,WCRV,361,3,0.)
 CALL FENCE3 (UCURVE, VCURVE, WCURVE,
+ NPNTS, IOREN, BOTTOM)
- UCURVE, VCURVE, WCURVE
- Real arrays, Input---Arrays of length at least NPNTS, containing the U, V, and W coordinates, respectively, of the points defining the curve whose projection is to be drawn.
- NPNTS
- Integer, Input---The number of points defining the curve.
- IOREN
- Integer, Input---The direction in which fence lines are to be drawn, as follows:
- 1 Parallel to the U axis.
- 2 Parallel to the V axis.
- 3 Parallel to the W axis.
- BOTTOM
- Real, Input---Specifies where the bottom of the fence is to be drawn. For example, if fence lines are to be drawn parallel to the W axis and BOTTOM = 2., then the bottom of the fence would be in the plane W = 2.
- The word "bottom" may be misleading here; the entire curve might be below the plane of the "bottom" and the fence might be horizontal, rather than vertical, in the three-dimensional space.
The fthex04.f code segment stores the U, V, and W coordinates of a series of points along a curve in 3-space (the curve is the intersection of a sort of spiral cylinder with the surface defined by the arithmetic statement function on line 1) and then calls FENCE3 to draw the curve. Note that no attempt is made to smooth the curve; it is approximated by drawing the straight-line segments defined by adjacent points in the input arrays.
The call on line 2 flushes the SPPS polyline buffer, so that lines waiting in that buffer to be drawn will not be affected by the change in line width that is requested by the GKS call on line 3. (Note: FENCE3 flushes the SPPS polyline buffer after drawing a curve, so you needn't worry about its leaving anything in the buffer.)
Lines 4 through 9 define the input arrays, and line 10 calls FENCE3.
The curve and the fence are drawn in the colors implied by the values of the variables ITHRMJ and ITHRMN, respectively, in the Threed COMMON block:
COMMON /THRINT/ ITHRMJ,ITHRMN,ITHRTX
The default value of both ITHRMJ and ITHRMN is 1; user code may change these values.
The routine PWRZT can be called to draw the projections of character strings that are positioned in any plane perpendicular to one of the three axes.

1       CHARACTER*8 CHRS
2       CALL PWRZT (.5,0.,1.1,'U',1,3,-1,+3,0)
3       DO 102 ILAB=1,10
4          UPOS=REAL(ILAB)/10.
5          WRITE (CHRS,'(F8.1)') UPOS
6          IBEG=0
7          DO 101 ICHR=1,8
8             IF (CHRS(ICHR:ICHR).NE.' ') THEN
9                 IF (IBEG.EQ.0) THEN
10                    IBEG=ICHR
11                END IF
12                IEND=ICHR
13            END IF
14 101     CONTINUE
15         IF (CHRS(IBEG:IBEG).EQ.'0') IBEG=MIN(IBEG+1,IEND)
16         CALL PWRZT (UPOS,0.,1.05,CHRS(IBEG:IEND),IEND-IBEG+1,
17     +    3,-1,+3,0)
18 102  CONTINUE
 CALL PWRZT (UPOS, VPOS, WPOS, CHRS,
+ LCHRS, ISIZE, IDIR, ITOP, ICEN)
- UPOS, VPOS, WPOS
- Real, Input---The U, V, and W coordinates of a point in 3-space, relative to which the character string is to be positioned.
- CHRS
- Character expression, Input---The character string to be written. It may contain uppercase alphabetic characters, the digits 0 through 9, and the characters +, -, *, /, (, ), =, blank, comma, and period. Other characters are treated as blanks. (Note especially that lowercase alphabetic characters are not available.)
- LCHRS
- Integer, Input---The length of the character string CHRS (the number of characters to be written).
- ISIZE
- Integer, Input---The character width to be used, defined in terms of the width of the plotter frame. Because projected characters vary in width depending on just where they are placed within the box being viewed and the position from which that box is viewed, ISIZE is interpreted as specifying the width of a character when that character is positioned and viewed in such a way as to make it as large as it could possibly be---when the character is on the near side of the box and in a plane perpendicular to the line of sight.
- 0, 1, 2, or 3
- Character width is 1, 1.5, 2, or 3, respectively, times a standard width equal to 1/128th of the width of the plotter frame. For example, when ISIZE =3, the character width is
3/128ths of the width of the plotter frame.
- >3 Character width is in units of 1/1024th of the width of the plotter frame.
- One third of the "width" referred to here is white space. What ISIZE really specifies is the distance between the centers of adjacent characters in a string. Characters are digitized to be 7/6 * ISIZE units high and 4/6 * ISIZE units wide, excluding white space.
- IDIR
- Integer, Input---The direction in which the character string is to be written, as follows:
- +1 implies +U, -1 implies -U. +2 implies +V, -2 implies -V. +3 implies +W, -3 implies -W. Note that the character string cannot be written at an arbitrary angle; it must be written parallel to one of the 3-D axes.
- ITOP
- Integer, Input---The direction from the center of the first character to the top of the first character; possible values of ITOP are the same as those of IDIR, above. ABS(ITOP) must not be equal to ABS(IDIR).
- ICEN
- Integer, Input---The centering option, specifying where (UPOS,VPOS,WPOS) is relative to the string written:
- -1 The center of the left edge of the first character.
- 0 The center of the entire string.
- +1 The center of the right edge of the last character.
The fthex01.f code segment shows how to use PWRZT to label an axis/perimeter. No attempt has been made to generalize the code; it depends heavily on specific numbers having been used in the call to SET3.
Line 1 defines a character variable in which label strings may be formed. Line 2 writes an appropriate label for the U axis. The loop on Lines 3 through 17 writes 10 numeric labels for the U axis. The inner loop on lines 7 through 14 just finds the start and end of the numeric label in the character variable.
Because characters drawn by PWRZT are stroked using the GKS polyline primitive (so that they can be projected from 3-D to 2-D), they are drawn in the current polyline color, as determined by the last call to the GKS routine GSPLCI; by default, color index 1 is used. Line width is determined by the last call to the GKS routine GSLWSC; by default, the line width scale factor is 1.
It is not particularly easy to overlay output from Surface and Threed. The example described here does it using previously-unadvertised features of both packages. It is hoped that the new 3-D package now in preparation will make this technique obsolete and make it easier to overlay such output.
1       COMMON /TEMPRT/ RZRO
2       COMMON /SRFIP1/ IFR,ISTP,IROTS,IDRX,IDRY,IDRZ,IUPPER,ISKIRT,
3      + NCLA,THETA,HSKIRT,CHI,CLO,CINC,ISPVAL
4       DIMENSION PEYE(6)
5       DIMENSION U(21),V(21),W(21,21),RWRK(882)
6       IFR=0
7       ISKIRT=1
8       HSKIRT=0.
9       (set U, V, W, UMIN, UMAX, VMIN, VMAX, WMIN, WMAX, and RZRO)
10      PEYE(4)=.5*(UMIN+UMAX)
11      PEYE(5)=.5*(VMIN+VMAX)
12      PEYE(6)=.5*(WMIN+WMAX)
13      CALL SETR(UMIN,UMAX,VMIN,VMAX,WMIN,WMAX,RZRO)
14      CALL SET3(.0087976,.9902248,.0087976,.9902248,
15      UMIN,UMAX,VMIN,VMAX,WMIN,WMAX,PEYE)
16      CALL PLOTIF (0.,0.,2)
17      CALL GSLWSC (2.)
18      CALL SRFACE (U,V,W,RWRK,21,21,21,PEYE,0.)
To overlay Threed and Surface output, you must ensure that both packages use the same mapping from 3-space to 2-space. There are three parts to this, as shown in the fthex05.f code segment:
Part 1: Line 1 declares a Threed COMMON block in which it is possible to communicate to the package a value RZRO which, when set nonzero, selects a different internal scaling option. The same value is passed to Surface by the call on line 13 and performs the same function in that package. The value of RZRO is that distance from which the box defined by the values of UMIN, UMAX, VMIN, VMAX, WMIN, and WMAX, when viewed from the direction that makes it largest, is to just touch the edges of the viewport in the image plane. Using an eye position closer to the center of the box than RZRO will result in a larger image and using an eye position further from the center of the box than RZRO will result in a smaller image.
Part 2: Line 4 declares an array in which to put the eye position for Threed (elements 1, 2, and 3) and both the eye position (elements 1, 2, and 3) and the position of the point looked at (elements 4, 5, and 6) for Surface. On lines 10, 11, and 12, the position of the point looked at is set to the value that Threed will use by default (the center of the box defined by UMIN, UMAX, VMIN, VMAX, WMIN, and WMAX), so that Surface will do the same thing.
Part 3: The first four arguments in the call to SET3, on lines 14 and 15, have just the right values required to ensure that Threed will use exactly the same viewport that Surface will use.
Lines 2 and 3 declare a Surface COMMON block providing access to internal parameters controlling various aspects of its behavior. Lines 6, 7, and 8 set parameters to turn off frame advances, to turn on the drawing of a "skirt," and to specify the level at the bottom of the "skirt."
Line 5 defines arrays to be used as arguments in the call to SRFACE. Three of these define the surface to be drawn and the final one is a workspace array.
Lines 16 and 17 flush the SPPS polyline buffer and double the GKS line width, so that the surface drawn by the call to SRFACE, on line 18, will be bolder than the rest of the plot.
Previous chapter LLUs Home Next chapter